RayTrace3DS 3D Studio Raytracer
by Konstantin Khanyants

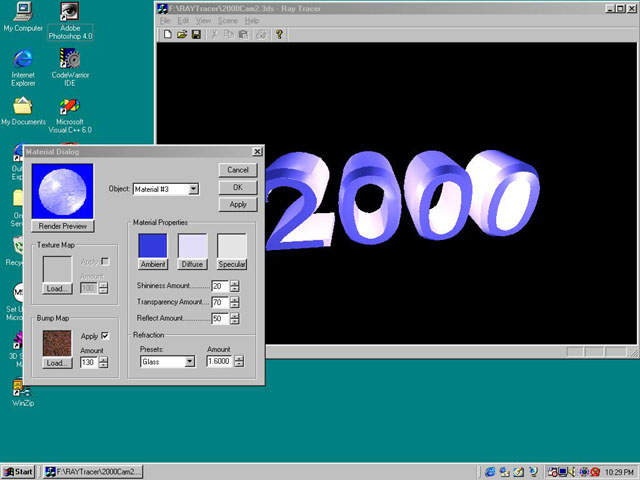
Screenshot.
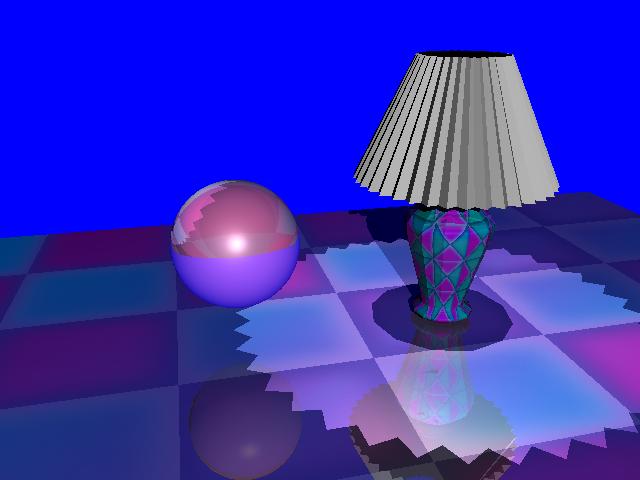
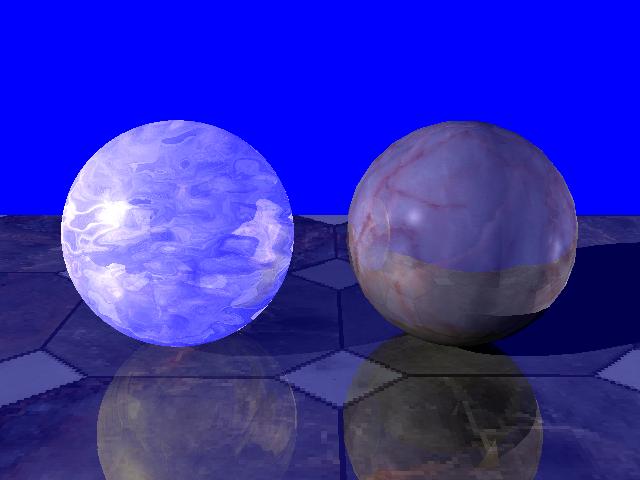
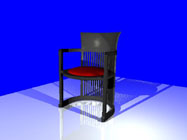
Some images rendered by RayTrace3DS
 |
 |
 |
 |
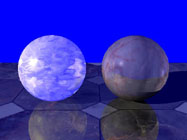
| Antialiased r endering of a textured lamp model and a sphere object. |
The chair was a 3D Studio model containing 4806 triangles and two materials. It was traced to a depth of three rays. |
Demonstrating the refractive and texture antialiasing features of RayTrace3DS. The scene was traced to a depth of 6 rays. |
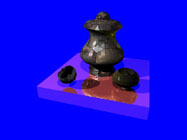
Rendering of a collapsed sphere and a vase model. Traced to a depth of three rays. |
Description: RayTrace3DS is an Object-Oriented, Windows based Ray Tracing program designed to provide a type of rendering in which rays are cast from the view point in a three dimensional scene where intersections with geometrical objects like triangles can be used to compute the color of a pixel in the rendered image. This rendering type that was previously unavailable in 3D Studio and thus spawned the need for this program.
History
During the fall of 1999 I plunged myself into the world of computer graphics. At that time I needed a huge project to prove my worth as a programmer and an artist. So, I bought some course books on computer graphics, however, none of them seemed to explain the Ray Tracing process in detail. After all the theory I got from the course books I moved on to a case study of an Object Oriented Ray Tracer by Nicholas Wilt which he explained in his book Object Oriented Ray Tracing in C++. This was a great place to start, however by today's standards the Ray Tracer was out dated in many respects. It's design, although Object-Oriented did not yield itself easily to a modern interface such as the one that could be found in Windows 98. The main parts of the Tracer were redesigned to be more user friendly than the old DOS command line prompt. Also new geometrical objects were added, surface classes extended and etc. Most Ray Tracers done by students use either a grammar based language or a very simple ASCII based OBJ file format from Alias/Wavefront to create the 3D scene. Since as a digital artist, I mainly worked with 3D Studio MAX, it seemed fitting that I somehow get the meshes from there. At the time I found the original file toolkit from Autodesk, and also had a book that explained various 3D file formats. There are too many features of the Ray Tracer to mention here, but suffice to say it was worth all the work. In the same project I also integrated a class library of various image formats which used the vendors' original C libraries.
File Import:
- 3D Studio .3DS files from all four releases. Imported information can include: materials, bitmap information, triangle mesh objects with smooth group information that is used to compute vertex normals, UV vertex mapping coordinates, background color, light sources: Omni and Spotlight, and cameras.
- As Image files any kind of TIFF, JPEG, BMP, and Targa file can be imported or exported.
Rendering:
- Phong and Flat shading types, depended upon the state of the imported material.
- Distributed Ray Tracing supported through supersampling.
- Objects supported: sphere and triangle.
- Texture Mapping: Cylindrical, Projection, Spherical, and UV vertex.
- Bump Mapping: for front and back facing polygons, and also supports antialiasing.
- Bitmap features supported: antialiasing, rotation, and scaling.
- Light source types: directional, point, and spotlight.
- Attenuated light sources.
- Interactive previewing in OpenGL. Features supported include: textures, light sources: point and spotlight, transparent objects, camera panning and rotation, auto-centering of meshes, and ability to save the scene in an image file.
- Multi-Threaded rendering in both material preview and scene render.
- Multiple materials assigned to one mesh.
Material Editor:
- Ability to change material properties on the fly and preview in either the dialog's Ray Tracing preview window or in the OpenGL window.
- Properties that can be changed include: ambient, diffuse, and specular color, texture and bump maps and amounts of each, shininess, transparency, reflictivity, and the index of refraction.
- Ray Traced preview of the material on a sphere.
Interface:
- MFC based interface.
- Auto Centering of meshes.
- Multiple camera selection from the Scene menu.
- Maintain several Ray Tracing windows simultaneously.
- Ability to halt the rendering process, and save the output in an image file.
Opening Files
As you already might know RayTrace3DS opens 3D Studio files with an extension .3DS. From this file information such as polygons and materials are imported into the Ray Tracer and converted into an internal format. Files can be opened by clicking on the file open button on the tool-bar or selecting Open from the File menu.
Before opening files in RayTrace3DS make sure that all of your texture maps are either directly in the folder that contains the .3DS file or in the sub-folders named Maps or Textures located within that folder. If a specified texture is not found when the file is opened, the program will prompt you with a message, you can later load the texture through the Material Editor dialog box.
Limitations: At the present time .PRJ, .MAT, and .SHP files are not supported. Also not supported are procedural textures or PXP's. Certain geometry especially from versions 2 and before of 3D Studio files sometimes causes errors in the computation of normal vectors.
Camera Selection and Movement
Upon loading the file RayTrace3DS automatically selects a camera model from the scene. If the scene doesn't contain a camera then the default camera is used. You can select another camera if your scene has more than one from the Camera menu in the Scene menu. Using the mouse and clicking within the window and dragging you can pan the camera around to achieve the desired perspective of the scene with for the final rendering. The Auto Centering option also from the Scene menu centers the meshes in the scene to an average geometrical center. This feature is useful for viewing scenes that only contain one object.
Limitations: No zooming feature at this time.
Material Editor Dialog
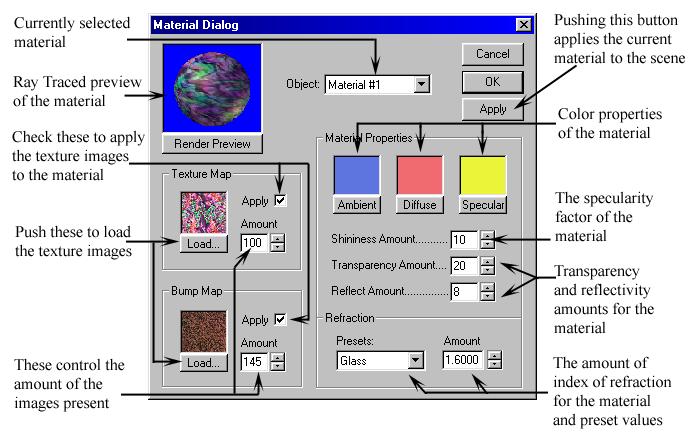
As you can see the dialog is straight-forward. The ray tracing process is multi-threaded, which means that you can still change background settings while rendering the preview of the material. However it is worth mentioning that if the OK button is pushed the current material is automatically applied to the scene. Any changes applied to the scene will be instantly evident in the OpenGL preview. Also, in order for refraction to work, the material must be transparent.
OpenGL Preview Mode
OpenGL output can be saved in an image file by selecting Save As... from the File menu or pressing the save file button on the tool-bar. The preview supports point and spot light sources, transparent objects, texture mapping, and flat and smooth shading of polygons.
Choosing Background Color
If you would like to choose a color that is different from the color derived from the 3D Studio file then choose the Background Color... from the Scene menu. This will pop up a color dialog box where you can choose the color that you want.
Ray Tracing the Scene
Ray Tracing the scene is very straight forward. Choosing Ray Trace... from the Scene menu prompts up a Ray Trace dialog box where you can select the width and height of the image. In this dialog you can also choose the antialiasing mode used when rendering and the depth to which the scene is traced. Pressing OK will open a window in which a multi-threaded process of rendering has begun. This process is very convenient to have if you want the image to render in the background, while you work in some other application. You can halt the rendering process by pressing the close button or selecting Close from the File menu of the Ray Tracing window. Several windows of Ray Traced images can be sustained at the same time, but only one could be rendering at a time. When the application exits you will be prompted to save the Ray Traced images (if any exist) if they were not already saved.
Limitations: So far most of the Ray Tracing options are set internally and need to be integrated into the interface.
How to Install
Just unzip, and you're ready to go.
To install the RayTrace3DS program you must have:
Pentium processor or higher computer
Windows 95/98 or Windows NT 4.0
32 MB of RAM is recommended (the program is very high on memory requirements)
OpenGL Runtime Libraries
1024 x 768 Resolution recommended
Download RayTrace3DS.zip - 901 KB
This package contains the RayTrace3DS application and the example 3D Studio scene files and textures.
Download Source Code.
Download RayTrace3DSSrc.zip - 891 KB
Directions for usage: Download and unzip. Open the file RayTrace3D.dsw located in the RayTrace3D Source folder. Build the project. You can find 3D models and textures to experiment with in the application only package.